EaseUS Data Recovery Review | Technical Explore

How to Recover Deleted Recycle Bin/Memory Card/Hard Drive Files?
We all know how it feels to lose tons of crucial data due to hard drive crashes, or even due to some blunders we made, like pressing the Shift+Delete! These might include important documents and videos, or even photos that are close to our hearts. We have been through that situation in which we have tried innumerable ways and even agreed to pay huge sums to get back those files. You may have also tried to install various recovery software, but they didn't just turn out to provide desirous results.
Mistakes or storage drive crashes are quite common, and you can’t altogether stop them from happening. What you can do is to bring back your files by opting for a reliable and efficient data recovery software. In this article, we will be discussing how you can recover all your deleted files and documents with ease and for free.
Some Effective Methods to Recover Deleted Files
There are efficient recovery software, which offer quick and complete recovery solutions for all your lost files. You can try out the EaseUS Data Recovery Wizard Free application to get them back without any hassle. It is a data recovery application that helps to retrieve all your formatted files on SSD or HDD disks, USB drives and other removable disks. You can even recover deleted files from recycling bins.
Also Read: Best CCleaner Alternatives for Windows
The primary advantage of using this software is that you can recover just any file from any device, no matter whether it is Windows or Mac desktops and laptops, or a mobile device running on iOS or Android. It is known to have higher success rates than other such tools as it serves over 100 real-life data loss scenarios, including deletion, RAW, formatting, and others
How to Recover Deleted Files from SD Card or Hard Drives?
Whenever a data loss happens, the first thing you should remember is to stop using your external storage device or your computer system. This is because after a file has been deleted, it is hidden by the system and marks it as free space. You will have a chance of retrieving the file by rebuilding the entire file directory. If you use the device and add new files, this free space is overwritten and gets removed, which means the chances of a successful recovery of the file is minimized. Storage devices like hard drive, USB drive or SD cards are more vulnerable to such risks since they come with limited space.
EaseUS Data Recovery Wizard makes use of advanced and powerful algorithm technologies that are designed to scan each storage unit within any physical hard drive thoroughly. You can follow the below-mentioned steps for hard drive or SD card recovery.
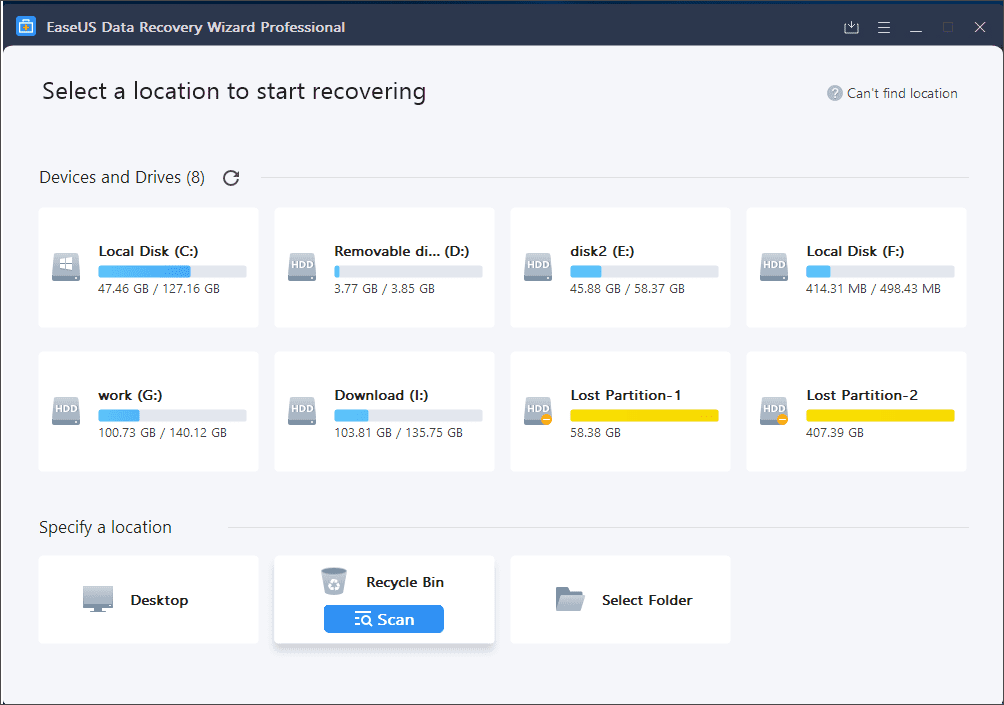
Step 1: If it is a removable storage device or a local HDD, you can choose the exact file location. After this, you need to click the ‘Scan’ button on the EaseUS Data Recovery Wizard application and to continue. Wait for the scan process to complete. It might take some time.

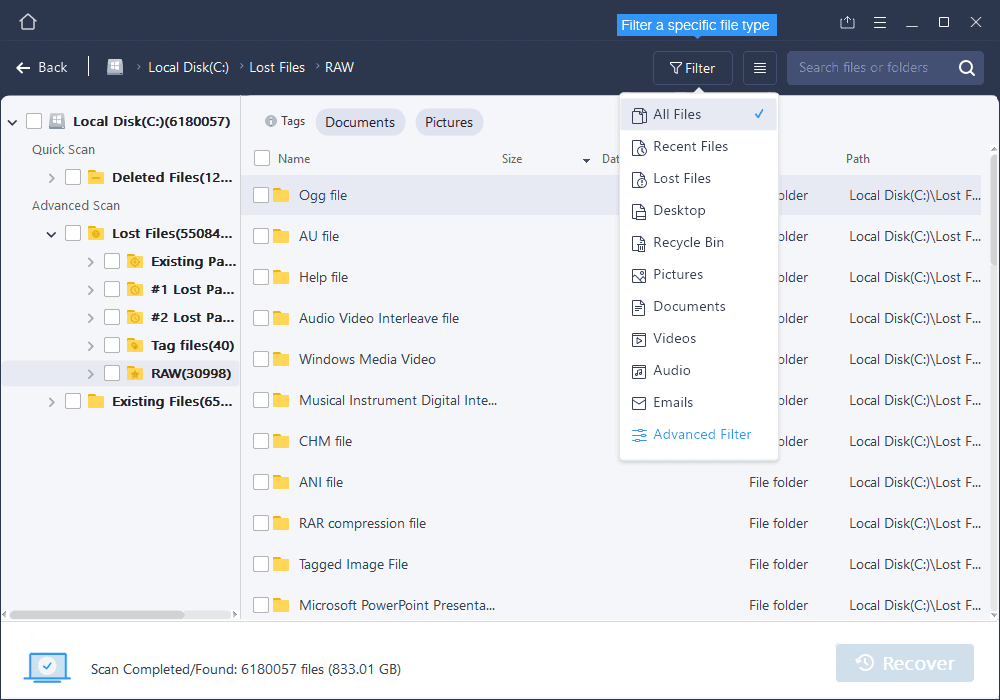
Step 2: After the scan process is over, you can preview the files that have been found. From the list, you can then select the one you need. You can choose an unlimited number of files that you wish to retrieve.

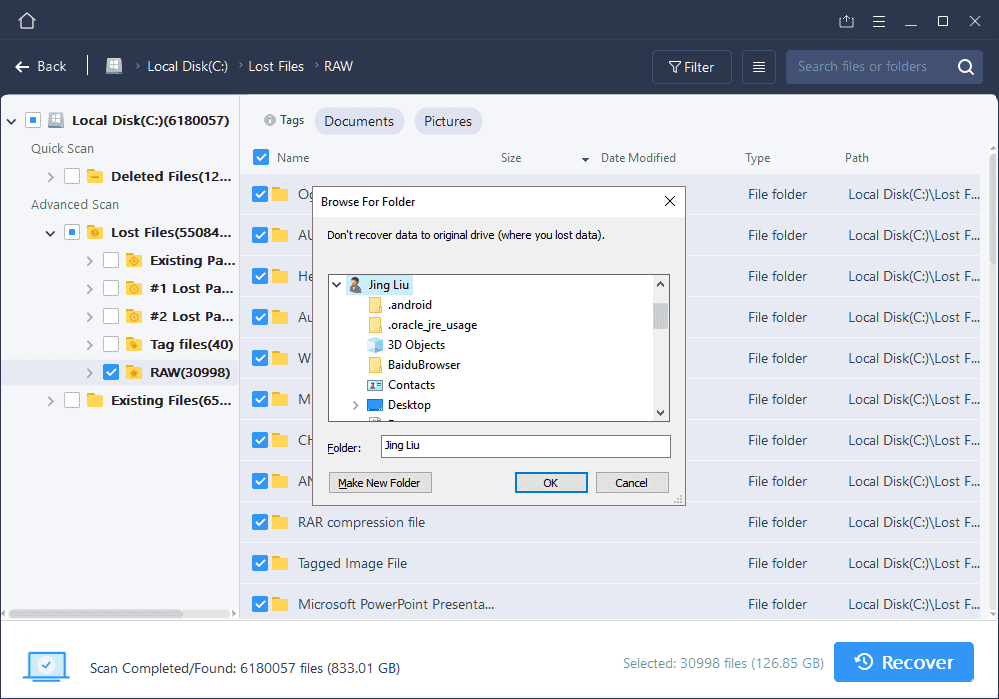
Step 3: Next, you need to click the ‘Recover’ button for saving the restored files at some other location. Then hit ‘OK’ and let the HDD or SD card recovery process finish.

Caution: Remember not to restore it to the original location where your file was previously to avoid overwriting issues. You can always transfer your files to that location later after the recovery process is completely over.
How to Recover Files from an Emptied Recycle Bin?
Recovering files from a Recycle Bin would have been a lot easier if you haven’t emptied it - just open Recycle Bin, locate the file, right-click and hit Restore. Done! All files are retrieved at once! But now that you have already emptied it, there’s only one way out. You can try recovering an older version of your lost files with the help of the free backup and restore tool that is inbuilt within Windows.
Also Read: Best Duplicate File Finder for Android
In Windows 7:
Step 1: Hit the ‘Start’ button > Go to ‘Computer’ > Navigate to the original folder that used to have that deleted file or folder.
Step 2: Next, right-click on the folder, and then click on ‘Restore previous versions’.
Step 3: Here, you will find a list of the available previous versions of the lost files or folders, along with different dates and times. You need to choose the version, which you wish to retrieve and then click on the ‘Restore’ option. The recovery process will be done quickly.

In Windows 10/8.1/8:
Step 1: You need to open the folder which used to have the deleted files. Then click on the ‘History’ button.
Step 2: The File History will then display a list of all the files that are present in the most recent backup file of that folder.
Step 3: Then, you need to click on the ‘Previous’ button for locating the file you wish to retrieve. Then select that file and click on the ‘Restore’ button. Your file will be restored quickly.

How to Recover Permanently Deleted Files from Recycle Bin?
What if I don’t have a backup of my lost files or folders? What if they are permanently deleted? Are they completely lost? Not really! Windows marks the space in the hard drive that was previously occupied by the files that are now deleted as available for use. However, the data is not erased or overwritten until you use that space. You cannot display that space normally through My Computer or via any DIR command. Only a good data recovery software can spot those files.
The good news is you can still recover them with the help of a reliable and efficient recovery tool. You can try using EaseUS Data Recovery Wizard for retrieving all the permanently deleted files from the Recycle Bin. You can actually preview most of your deleted files before recovering them. Here’s how -
Step 1: Select the Recycle Bin for scanning. Launch the above-mentioned EaseUS file recovery tool on your PC. Go to ‘Specify a location’ section and then click ‘Recycle Bin’. After this, hit on the ‘Scan’ button.

Step 2: Next, the tool will immediately start a quick scan for all your emptied files. Later, it will launch a deep scan session for scanning more of your lost files. Once the scanning process is over, you can use the Filter feature of the software to filter for a specific file type for a quicker search, such as images, videos, documents, etc.

Step 3: After you locate your desired files, double-click on the file for a full preview. Next, select the files you want to retrieve and click on the ‘Recover’ button. Your files will be recovered in a breeze!

All the above methods hold true for any Windows version like 10, 8.1, 8, 7, XP or Vista. Mac users can also use the Mc version of EaseUS Data Recovery Wizard and recover their lost files with ease.


