Looking for a solution on how to apply update from ADB? Android smartphone users will agree with the fact that their phones are functioning on a kind of operating system that requires timely updates in order to be able to function effectively each time. The system is ever-evolving and while Google is quite good at releasing timely updates, the updates aren’t released for all smartphone users at the same time. In situations like these, the smartphone’s Stock Recovery Mode (SRM) software comes handy.
There are various features that SRM offers to Android users. Besides ensuring that your smartphone receives the latest Android OS update in the minimum time possible, it provides you with a plethora of shortcuts to get your way around numerous glitches that may be causing you trouble. It is through the Recovery Mode that you are also able to find your way through to how you may apply an update for ADB sideload.
If you have an Android smartphone that needs fixing or updating, read on more to find out how you may be able to achieve that experience with minimum effort.
What does ADB mean?
ADB stands for Android Debug Bridge – it’s nothing more than a command tool for Android. It is by default, present in all smartphones. Due to its brilliant feature wherein it allows for a direct connection, most tech developers make use of ADB to connect the Android smartphone to a computer. This again is possible using a USB wire or you can even opt for a wireless connection. Since you’re able to execute commands on your smartphone using your computer through the use of ADB, the debugging process takes a lot less time and becomes all the easier.
ADB is a client-server program and is made up of three components, i.e.
- The Client: ‘The Client’ refers to the computer and the Android device that is subject to the process
- Daemon or The Client Service: Daemon (which is also known as ADBD), is a “Client Service” required to be present in the computer as well as the Android device (“The Client”) to enable the dictation of commands
- The Server: “The Server” is the actual piece of software, responsible for managing any and all communications between the “Client” and Daemon
It is only when these three components work together that you’re able to successfully execute a function on your Android device but through the use of your computer.
What does apply update from ADB mean?
In the simplest of terms, when you apply an update from ADB sideload in your smartphone, you’re basically enhancing your device’s functionality through the use of a zip file. Most commonly done through a computer, applying an update for ADB sideload will instantly resolve any viruses or glitches that you may be facing with your smartphone.
How do I install ADB on my Android smartphone?
Following given are quick and easy steps for you to follow, in case you’ve decided to install ADB on your smartphone:
- Step 1: Start by clicking open the ‘Settings’ option on your Android smartphone
- Step 2: Once you’re in the ‘Settings’ option, click open the ‘About Phone’ option which is located at the bottom-most portion of the list
- Step 3: Once you’re in the ‘About Phone section of your Android smartphone, make sure you’re tapping the ‘Build Number’ option at least 7 times. When you hit it 7 times, you’re basically ensuring that you enter the ‘Developer Mode.’ You will be notified by the device, once you’re in the ‘Developer Mode.’
- Step 4: Once you’re in the ‘Developer Mode,’ you can head back to the ‘Settings’ window and click open the ‘Developer Options’ menu that has newly appeared since you tapped on it 7 times
- Step 5: Once you click to open the ‘Developer Options,’ you will find yourself with a lot of options and among them will be the ‘USB Debugging’ option that you must click and viola! It is done.
How to apply an update from ADB Sideload?
Are you already with ADB installed on your Android device? Once you’ve done this, you will realize just how easy the next few steps are. These steps will guide you through the process of applying an update for ADB sideload:
Step 1. Before you start the process, you need to make sure that you have access to the updated zip file of your Android device. If you’re looking for a zip file of your device. This can get quite tricky and unless you’re an absolute expert at all things IT, we suggest that you refer to XDA Developers Forum. The community is popular for posting guidelines on similar things. All you need to do is simply search for your device’s dedicated forum and you will be able to find your device’s updated zip file there.
Step 2. Once you have the zip file of your device, it is time for you to set up your devices for actual work. You start this by connecting your Android device to your computer (which will either be Windows/Mac PC). The mode of connection is a choice you have to make – you can either make use of a USB cable or can simply connect wirelessly – the decision is yours.
Step 3. You need to be aware that you’re going to be making changes to your Android device using command lines on your computer. Therefore, things won’t appear in the form of options – the way they appear on your device. It is always better to ensure that you are not confused. One of the things we recommend you do is rename the zip file of your device to “Update.zip” so that you know which one you need to pick up. Once you’re done renaming the zip file of your Android device, you can start with moving or rather copying it to your Desktop.
Step 4. What happens next depends on what kind of computer you are making use of. If you’re using a Windows computer, you must follow the given instructions: Click right-click while consequently pressing “Shift” at the same time. Following this, you are required to choose the “Open PowerShell” option. In case you’re a Mac user, you are required to “Open Terminal.” You can do this by right-clicking on the Desktop and choosing the “Select Terminal” option.

Step 5. On both computer types, you will face an option where you can enter a command line. Make sure you enter “ADB devices” as the command line. This will enable USB debugging. Following this, you need to enter the following command line: “ADB Reboot Recovery.”
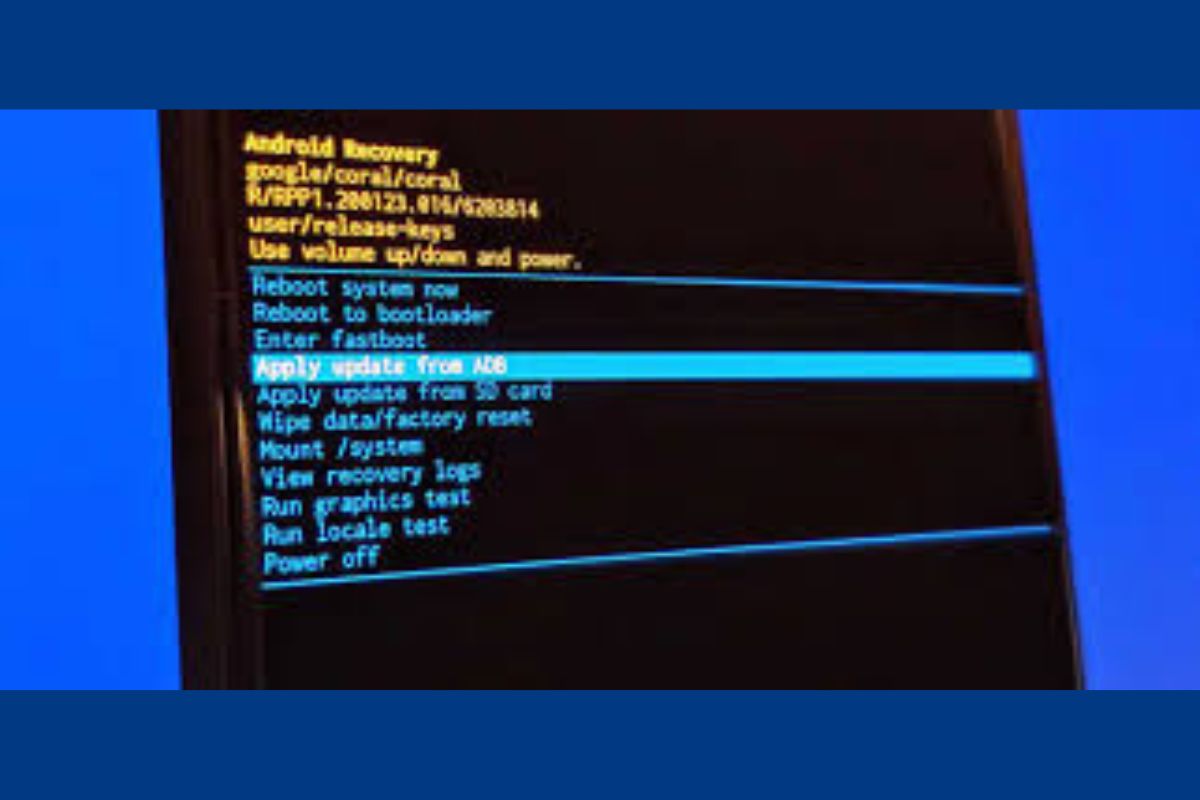
Step 6. Following the previous step will get your Android device to enter what is known as the ‘Recovery Mode’ or the ‘Stock Recovery Mode.’ Things are super easy going forward. You need to select the “Apply Update from Fast Boot” option and when you face another window, you must enter the following command, “ADB Sideload Update.zip.” This is designed to initiate the “Flashing” process for your Android device.
What are the benefits of ADB?
Some of the benefits of using ADB are given as follows:
- Quick actions: You are able to take quick actions through the simple method of sending through command lines from your computer. Trust us, it is way easier to make use of a computer to send command lines, in comparison to a hand-held device.
- Apply updates directly: When you’re making use of the ADB methodology, not once do you have to go through your smartphone for any single action. You are able to apply updates directly to your phone using your computer.
- Ease of transfer: It is way easier for one to transfer files from the phone to the computer and vice versa through the use of command lines on your computer, thanks to ADB.
What does ADB Sideload mean?
While we have been making use of the term, ‘ADB’ and understanding it better, there is another term called ‘Sideload’ that has been mentioned a few times already in this blog. The main reason why this is so is that ‘ADB Sideload’ actually tends to go hand in hand while improving the efficiency of an Android device. ‘Sideload,’ in this context actually refers to uploading or downloading the device’s content.
If you’re planning on transferring data between a smartphone and a computer, you will need the assistance of “sideloading” the data. In this case, you will be “sideloading” ADB from your computer to your smartphone.
What are the benefits of ADB Sideload?
When working together, ADB Sideload has its way of making lives easy for us tech-lovers. Some of the many advantages of ADB Sideload are given below:-
- Remote transfer: Many like to make use of a USB cable to make the data transfer. But, did you know that you could transfer data without a cable? That’s the best thing about ADB Transfer it is possible wirelessly as well.
- Quick fix: If you’re looking for a quick fix to address any issues in your Android smartphone, then you can opt for this method. It is a time-saving hack that you should know about.
Conclusion
In a time where technology rules, ADB Sideload is a savior – of time, energy, and efforts. It is a quick and easy option to seek when it comes to transferring data or installing new updates on the phone to name a few benefits.
